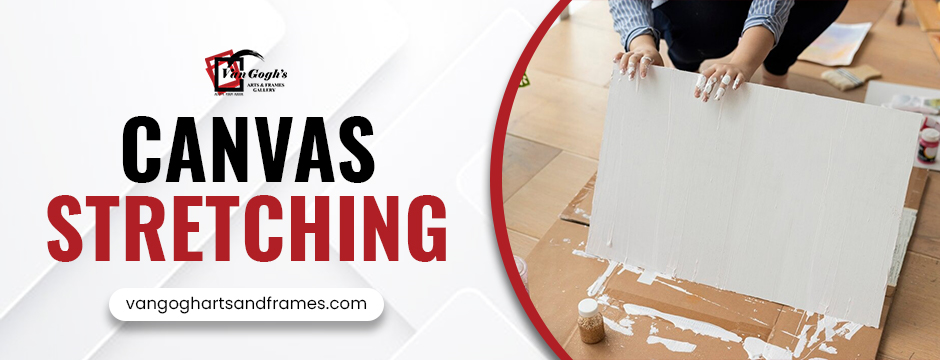
When it comes to creating or preserving beautiful artwork, one of the most essential yet often overlooked skills is canvas stretching. Whether you’re an artist preparing your canvas for painting, a gallery owner displaying original pieces, or a hobbyist working on DIY home décor, knowing how to stretch a canvas properly ensures your artwork looks professional and lasts for years. A well-stretched canvas provides the perfect tension for painting, prevents sagging over time, and enhances the overall presentation of the piece.
Many beginners assume that stretching a canvas requires expert craftsmanship or expensive tools. In reality, with the right guidance and a bit of patience, anyone can learn this valuable technique. From selecting the right materials to mastering corner folds, every step plays a role in achieving a smooth, taut surface.
Step 1: Gather Your Materials
Here’s what you’ll need:
- Canvas fabric (pre-primed or unprimed)
- Stretcher bars (wooden bars that form the frame)
- Staple gun and staples
- Canvas pliers (for gripping and pulling the canvas tight)
- Scissors
- Rubber mallet (optional, for adjusting stretcher bars)
- Measuring tape
Having everything ready ensures a smooth workflow and prevents interruptions during the stretching process.
Step 2: Assemble the Stretcher Frame
Stretcher bars typically come with interlocking corners.
- Lay out the bars on a flat surface.
- Fit the corners together, ensuring that each angle is a perfect 90°.
- Tap gently with a rubber mallet if necessary to secure the joints snugly.
- Double-check that the frame is square by measuring diagonals — both should be equal.
A properly squared frame is crucial. If it’s misaligned, your canvas will not stretch evenly, leading to wrinkles or distortions.
Step 3: Position the Canvas
Roll out your canvas fabric on a clean surface with the primed side facing down. Place the assembled stretcher frame on top of it, leaving about 2–3 inches of extra fabric on each side. This allowance is important for pulling and stapling the canvas around the frame.
Using scissors, trim the canvas to size, maintaining an even margin all around.
Step 4: Staple the First Edge
Start on one of the longer sides of the frame with the photo frame shop Bangalore.
- Fold the canvas over the stretcher bar.
- Pull it snugly but not too tight to avoid over-stretching.
- Place the first staple in the centre of the bar.
- Work your way outwards, placing staples every 2–3 inches.
This initial edge acts as your anchor for the rest of the stretching process.
Step 5: Stretch and Staple the Opposite Edge
Move to the opposite side of the frame. This is where canvas pliers come in handy.
- Grip the canvas with the pliers and pull it firmly to create tension.
- Place a staple in the centre of this side, directly opposite the first staple.
- Continue stapling outward, alternating left and right, ensuring the tension remains even.
Avoid pulling too hard, as this can warp the frame. The goal is a smooth, drum-like surface.
Step 6: Stretch and Staple the Remaining Edges
Repeat the same method for the remaining two sides. Always start in the centre and work outward, pulling the canvas evenly as you go. Rotate the frame occasionally to check that the surface remains taut and wrinkle-free.
This crisscross stapling method ensures balanced tension, preventing one side from pulling more than the others.
Step 7: Neat Corner Folds
Corners can make or break the professional look of a wooden photo frames.
- Fold one side over neatly, tucking in the excess fabric.
- Pull the other flap over the top to create a clean, triangular fold.
- Secure the fold with 1–2 staples, ensuring it lies flat.
Repeat this process on all four corners. Take your time — clean corners give the canvas a gallery-quality finish.
Step 8: Check Tension and Adjust if Needed
Once all sides are stapled and corners are folded, tap gently on the canvas surface. It should produce a tight, drum-like sound. If there are any loose areas, use the pliers to pull and re-staple as needed.
Minor adjustments at this stage can significantly improve the final appearance.
Step 9: Trim Excess Canvas
Use sharp scissors to trim away any excess fabric along the back of the frame. This keeps the back neat, especially if you plan to frame the canvas later or leave the edges exposed for a modern look.
Step 10: Optional Finishing Touches
- Prime raw canvas with gesso for painting.
- Add corner keys to fine-tune tension later.
- Attach the hanging wire if the canvas is ready for display.
These finishing steps give your Canvas Stretching a polished, ready-to-hang quality.
Common Mistakes to Avoid
- Over-stretching: Can cause warping and uneven surfaces.
- Uneven stapling: Leads to puckering or slack areas.
- Ignoring square alignment: Results in skewed artwork.
- Rushing corner folds: Gives a messy, unprofessional finish.
Patience and precision are key to mastering this craft.
Bottom Line
Learning how to stretch a canvas is a valuable skill that transforms how your artwork is presented and preserved. By following these step-by-step instructions, beginners can achieve crisp edges, smooth tension, and a clean, gallery-worthy finish without relying on expensive pre-stretched canvases.
For those who want expert-quality canvas stretching, framing, or art presentation services, it’s wise to trust experienced professionals. Van Goghs Arts And Frames is a trusted destination for premium stretching, custom framing, and art display solutions. Whether you’re a painter, collector, or designer, our team combines craftsmanship with precision to give your artwork the perfect finish.